Star Trek Discovery: Into the Forest I Go
Season 1, Episode 9
Written by Bo Yeon Kim and Erika Lippoldt
Directed by Chris Byrne
“Captain, I’m afraid I don’t know where we are.”
Current conspiracy theories contend that the Captain Lorca we see belongs to a mirror universe. Somehow when his former ship was destroyed, he voluntarily or involuntarily took up residence in our dimension. Most of the evidence for this relies upon a plaque in the set decorations that contains an alternate name for the Federation. Though a few clues do suggest that the Captain Lorca that we know and love does not belong here, I have chosen not to explore those theories because I did not believe the evidence was particularly strong. Don’t dark side, alternate universe captains usually sport eye patches? I admit that Captain Lorca’s use of eye drops and light sensitivity might present a more subtle version of that, but it never seemed very likely. Rather, the mirror universe hinted at at the conventions and in the novel will open the second part of the series’ season in January. In fact, though management hinted at the possibility of one mirror universe, Stamets’ use of the spore drive actually indicates that there are infinite alternate universes. And, as a result of his intense use of the mushroom trip road, he can see them all. The really big question is whether he can travel between them, and take the Discovery back to the universe where it’s supposed to be. Star Trek: Voyager explored what happened when a starship was flung way out to the farthest edges of the universe and had to find its way home; it looks like Star Trek: Discovery may boldly go to exactly the same spot it’s currently in, but in a different space-time continuum. The journey home consists not of a trip of distance, but of dimension. The current indications suggest that this plotline does not establish the premise for the rest of the series, but only sets up a temporary excursion. But the only way to find that out is wait and see how it all unfolds.
In the meantime, Lorca needs to find a way to hack the Klingon cloaking device or follow orders and retreat back to star base. That would leave Pahvo to the mercy of the Klingons, and they have no mercy. To buy himself time, Lorca tells Starfleet that Stamets can’t handle another jump, so they’ll have to travel by snail trail (warp speed) rather than mushroom trip (spore drive). To justify this, he orders Stamets to undergo a medical examination. Though Stamets intended to keep his condition secret, the examination reveals disturbing structural changes in his brain.
Despite this dire medical foreshadowing, Lorca asks Stamets to undergo 133 rapid fire jumps. Lorca intends to send an away team to plant sensors on the Klingon Ship of the Dead, then use the jumps to calibrate an algorithm which will allow the Discovery to find and fire on the Klingon ship even when it is cloaked. Lorca and Kol engage in a kind of spore drive-fueled game of cat and mouse while Burnham sets up the sensors, and the Discovery computer calculates the algorithm needed to overcome the cloaking device. All these micro jumps cause huge suffering for Stamets. As the jumps progress, Stamets’ dark blue eyes get lighter and lighter.
Burnham and Tyler successfully beam aboard the Ship of the Dead. The sensors must be placed as far apart as possible, which requires Burnham and Tyler to traverse the length of the Klingon ship without being seen. They detect a human life sign aboard the ship and find Admiral Cornwell. She survived last week’s ordeal, though she is badly injured and cannot move her legs. L’Rell also survived last week’s run-in with Kol. When Tyler sees L’Rell, he suffers a PTSD flashback and goes into shock. Even as a firefight breaks out, Tyler cannot bring himself to fire at L’Rell. So, Burnham shoots L’Rell. Since neither Tyler nor Cornwell can function, Burnham must complete the sensor placement by herself.
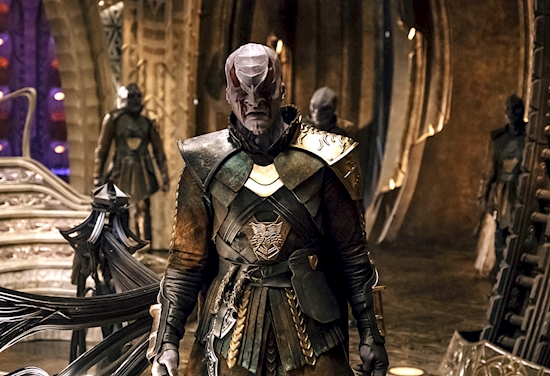
Once she places the second sensor, Burnham engages Kol on the bridge of the Ship of the Dead. At first she tries telling him that the Federation would be amenable to talks, using her universal translator as evidence. When he is having none of that, she switches her approach, and reveals that she was the one who killed T’Kuvma. She notices that he carries Georgiou’s communicator. Burnham asks for the right to fight to the death, just like her captain did before her. Kol throws her a blade and they fight hand-to-hand. At the same time, Cornwell tries to snap Tyler out of his shocked stupor back in the burial chamber. They engage in a phaser fight with the Klingons who are searching for the human intruders.
Burnham doesn’t fare very well fighting Kol. It looks like he will almost certainly defeat her, but the Discovery completes its algorithm and engages the transporter just before Kol can deliver a fatal blow. Burnham leaps off the balcony of the Klingon bridge and transports while in mid-air so Kol can’t stab her. As Tyler and Cornwell transport back to the Discovery, L’Rell grabs onto Tyler and transports as well.
Once all its personnel are back on board, the Discovery uses the new algorithm to target The Ship of the Dead, sending it and its crew to Stovokor. The huge explosion serves as vindication for Burnham and vengeance for Georgiou.
In the aftermath of the battle, Tyler explains to Burnham why he froze when he saw L’Rell. She was his captor and his torturer on board the Klingon prison ship. He reveals that he survived so long in captivity because L’Rell developed a sexual obsession for him. He chose to stay alive, and therefore encouraged the relationship. Both he and Burnham realize that his life, and their relationship, would not exist if he had not done so. But that doesn’t make the shame and the trauma diminish. Tyler feels compelled to confront L’Rell so he visits her in the brig. His interaction with her shows that there is a lot more going on than just a sick power relationship between an inmate and a guard. Somehow L’Rell got inside Tyler’s head – perhaps literally with some sort of device – and rendered him incapable of harming her. That seems to be why he could not shoot her when he saw her on the Sarcophagus. Further, it looks like her feelings for Tyler, whatever they are, continue. Perhaps she plans to use her hold over him merely to force him to help her to escape. It also sounds like she intends to pick up their relationship where they left off as soon as possible. This warped relationship between them clearly damaged Tyler. Whether it rendered him so compromised that he will betray his ship and his fellow crew members remains to be seen.
Despite disobeying a direct Federation order, Lorca gets offered a medal, which he then tries to pass on to Stamets. Apparently defying orders matters a lot less than finding a way to defeat the cloaking technology and destroying the Sarcophagus ship. Stamets informs Lorca that he will do one last spore jump to get the ship safely docked at star base and away from the pursuing Klingons. After that, he will travel the mycelium highway no more, even though it means he will not get the chance to explore the alternate universes available through the highway.
The scenes leading up to this last jump fairly drip with foreshadowing. Stamets’ loving farewell to his partner Dr. Culber telegraphs that he may not survive the final jump. When the spore drive engages, Stamets screams and collapses. The ship fails to make the jump. The instruments show a navigational failure. As Stamets’ eyes turn white and his body breaks down, Lorca, Saru, and the bridge crew realize they are not where they are supposed to be. They can’t even figure out where they are. They are lost, and they don’t know whether they are lost in location, time, dimension, or all three.
Usually the conspiracy theories surrounding possible plotline developments are way weirder than the actual storylines. However, with the whole lost in space arc and with the Tyler/L’Rell subplot, Discovery has just out-freaked the geeks. Like Stamets says, the permutations are infinite.
Grade: A-
Source: cutprintfilm.com